


LRS Reference Manual
To configure IPX for remote networking, see Chapter 3 - Basic Remote Networking and Chapter 4 - Additional Remote Networking. For specific IPX commands, see Chapter 12 - Command Reference.
Bridges operate on the Data Link Layer, while routers operate on the Network Layer.The destination address of each packet is examined; the packet is then sent to its destination using the most efficient route. The "most efficient route" is determined using two factors: the network that the address is part of (See , below) and the router's Routing Table (see Routing Tables).
For a node on one IPX network to talk to a node on another IPX network, the packets must go through an IPX router, which knows how to talk on both IPX networks. This is depicted in Figure 6-1, where IPX network 1 and IPX network 2 are both attached to IPX router Alpha.
Figure 6-1: Simple IPX Routing
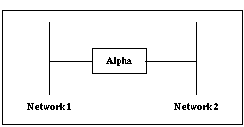
Alpha is configured with two interfaces, one using IPX network number 1 and the other using IPX network number 2. Packets from nodes on network 1 which have to go to nodes on network 2 are actually sent to Alpha which then sends the packets to network 2, and vice-versa. Thus no traffic goes directly between the two networks; they all go through the router. This is a simplified network.
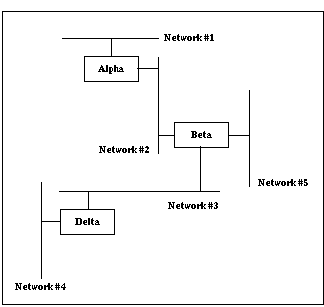
A more complex network is depicted in Figure 6-2, where IPX networks 3, 4, and 5 are added. Note that there is a router between each network. A router is required; nodes on different IPX networks can't communicate directly to one another.
Figure 6-2: More Complex IPX Routing
The external network is the network that all IPX nodes share. The internal network is unique to a particular IPX node. For example, when addressing IPX packets to a file server, the destination network number is the file server's internal network number. Since workstations don't have internal networks, when addressing packets to a workstation, the destination network is the external network number.
The internal network number for the LRS is the last four bytes of the unit's Ethernet address, for example, a3001234. If necessary, this number can be changed; however, it must be changed to a unique number, as two IPX nodes can't have the same internal network number.
To specify the base number of the range, use the Set/Define IPX Netrange command. Each serial port will be assigned an IPX network number equalling the sum of the base number and its port number.
Figure 6-3: Defining IPX Netrange
| Local>> DEFINE IPX NETRANGE 0x100 |
Entries may be added to the routing table in three ways: locally, statically, or dynamically.
Dynamic routes learned via sites are the exception - they are never timed out. The LRS assumes that these networks are reachable by bringing up a link. This allows the LRS to learn about extended networks at the remote site without the administrator's intervention.
When the file server sends SAP messages it's advertising the services it offers as living on this internal network. They also send out RIP packets announcing that they know how to get to this internal network.
When a workstation connects to a file server the destination network number is actually the file server's internal network, not the Ethernet's network. This is illustrated in Figure 6-4. In this figure, file server Frank and workstation Wally are both connected to the Ethernet.
Figure 6-4: Routing to Internal Network Number
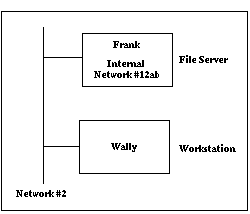
The network number for the Ethernet segment is 2, but Frank's internal network number is 12ab. Wally can't access network 12ab directly so it goes through Frank's routing agent, which "internally routes" packets to 12ab.
The IPX address consists of the network number, the node number, and the socket number. The network number is Frank's internal network number (12ab), the node number is usually 00-00-00-00-00-01, and socket number is 0x0451.
After Wally receives this SAP reply, it sends a RIP request for network 12ab. Frank sends a RIP reply stating that it knows how to get to network 12ab. Wally receives this and starts sending packets to Frank's routing process, which internally routes the packets to the file server process.
Figure 6-5 shows an additional router, Alpha, between Wally and Frank. When Wally tries to connect to Frank, Alpha will perform the function of Frank's routing process, replying to Wally's RIP and SAP requests. The end result is that packets from Wally are sent to router Alpha which sends them to Frank's routing process, which internally routes to them to the file server process.
Figure 6-5: Router Between Workstation and File Server
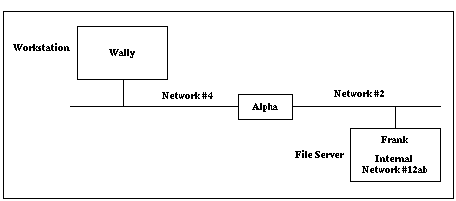
Figure 6-6: File Server and Workstation Separated by Phone Link
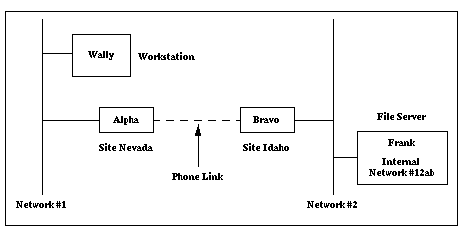
For this to work, router Alpha needs to know how to get to network 12ab and needs to know about file server Frank, and router Bravo needs to know how to get to network 1. This information can either be sent via RIP and SAP across the phone link or configured statically on Alpha and Bravo.
See Statically Added Entries for information on static routes.
1. When Wally wants to connect to Frank it will send a SAP request for a file server.
2. Alpha will send a SAP response with information about Frank, which is connected to network 12ab.
3. Wally receives this response and sends a RIP request for network 12ab.
4. Alpha sends a response to this since it has a route to 12ab.
5. Wally sends an establish connection packet to Alpha destined for network 12ab.
6. Alpha sends this packet to Bravo, which sends it to Frank.
7. File server Frank sends the reply to Bravo destined for network 1.
8. Bravo sends this to Alpha which sends it to Wally.
Figure 6-7: Enabling IPX Routing
| Local>> DEFINE IPX ROUTING ENABLED |
IPX can run on any of four different Ethernet frame types: ETHERNET_II, 802.3, 802.2, or SNAP. Typically all file servers and workstations on a network are configured to use one frame type. Check the configuration of the Novell file servers and workstations to see what frame type they are using.
Novell file servers also have an IPX network number associated with their Ethernet interfaces. This is not the internal network number. This a common network number that all IPX nodes share for a given network; all file servers on the network will have the same number.
To display the frame type and network number, type CONFIG on a file server console screen. Using the displayed type and number, configure the Ethernet interface:
Figure 6-8: Configuring the Ethernet Interface
| Local>> DEFINE IPX FRAME 802.2 NETWORK abcd Local>> DEFINE IPX FRAME 802.2 ENABLED |
Once a frame type is enabled, the IPX router process will send RIP and SAP requests to that interface to get all available routes and services. To confirm that the frame type and number are correct, use the Show IPX Interface command.
Figure 6-9: Confirming the Ethernet Interface Configuration
| Local>> SHOW IPX INTERFACE 802.2 |
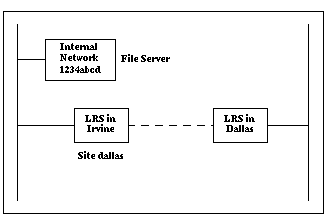
This section illustrates an example of static route configuration between a workstation, Wally, and a file server, Frank. Wally and Frank are connected by a phone link between LRS Alpha and LRS Bravo. See Figure 6-6 for an illustration.
Figure 6-10: Enabling IPX Routing and Configuring the Ethernet Interface
| Local>> DEFINE IPX ROUTING ENABLED Local>> DEFINE IPX FRAME 802.3 NETWORK 1 |
Figure 6-11: Defining Range of Network Numbers
| Local>> DEFINE IPX NETRANGE 10 |
Figure 6-12: Disabling RIP/SAP Listening
| Local>> DEFINE IPX FRAME 802.3 RIP LISTEN DISABLED Local>> DEFINE IPX FRAME 802.3 SAP LISTEN DISABLED |
Figure 6-13: Enabling IPX Routing on 802.3
| Local>> DEFINE IPX FRAME 802.3 ENABLED |
Figure 6-14: Configuring Static Route to Network 12ab
| Local>> DEFINE IPX ROUTE 12ab SITE idaho |
| Local>> DEFINE IPX SERVICE frank 4 12ab 00-00-00-00-00-01 451 |
Figure 6-16: Enabling IPX Routing and Configuring the Ethernet Interface
| Local>> DEFINE IPX ROUTING ENABLED Local>> DEFINE IPX FRAME SNAP NETWORK 2 |
Figure 6-17: Defining Range of Network Numbers
| Local>> DEFINE IPX NETRANGE 20 |
Figure 6-18: Disabling RIP/SAP Listening
| Local>> DEFINE IPX FRAME SNAP RIP LISTEN DISABLED Local>> DEFINE IPX FRAME SNAP SAP LISTEN DISABLED |
Figure 6-19: Enabling IPX Routing on SNAP
| Local>> DEFINE IPX FRAME SNAP ENABLED |
Figure 6-20: Configuring Static Route to Network 1
| Local>> DEFINE IPX ROUTE 1 SITE nevada |
1. Wally will request the nearest file server.
2. LRS Alpha has a static route to a file server, so it will respond with information about Frank.
3. Wally will then ask for a route to Frank's IPX network, 12ab.
4. LRS Alpha has a static route to 12ab so it will respond with that information.
5. Wally will then send an establish connection packet to IPX network 12ab.
6. LRS Alpha receives this packet and will route the packet to site idaho. If the link between Alpha and Bravo isn't currently up, Alpha will establish the connection.
7. When LRS Bravo receives the packet, it will get routed out the Ethernet interface to Frank.
8. Frank will send a reply to IPX network 1.
9. LRS Bravo consults its routing table, and routes this packet to site nevada.
Imagine that there is another file server on network 2, Delta, which has internal network number 74fca132 and hardware address
00-00-12-00-12-34. The following commands entered on LRS Alpha will allow workstations to connect to Delta:
Figure 6-21: Enabling Connections to File Server Delta
| Local>> DEFINE IPX ROUTE 74fca132 SITE idaho Local>> DEFINE IPX SERVICE delta 4 74fca132 00-00-12-00-12-34 451 |
When a new site is created, by default, the site will listen to RIP and SAP packets and will send RIP and SAP updates when information has changed. In some situations (for example, to reduce network traffic), RIP and/or SAP should be disabled. For configuration instructions, see RIP and SAP.
Spoofing is discussed in detail in Chapter 4 - Additional Remote Networking.
| Unknown | 0000 |
| Print Queue | 0003 |
| File Server | 0004 |
| Job Server | 0005 |
| Print Server | 0007 |
| Archive Server | 0009 |
| Administration | 000B |
| NAS SNA Gateway | 0021 |
| Remote Bridge Server | 0024 |
| TCP/IP Gateway | 0027 |
| Time Synch Server | 002D |
| Advertising Print Server | 0047 |
| NetWare Access Server | 0098 |
| Portable NetWare | 009E |
| Wildcard | FFFF |
| NetWare Core Protocol (NCP) | 0451 |
| Service Advertising Protocol (SAP) | 0452 |
| Routing Information Protocol (RIP) | 0453 |
| Novell NetBIOS | 0455 |
| Diagnostics | 0456 |
This LAN to LAN connection must meet the following criteria:
The leased line is connected to port 2 of the LRS.
Figure 6-22: San Diego LRS Configuration
| Local>> DEFINE IPX ROUTING ENABLED Local>> DEFINE IPX FRAME 802.2 NETWORK 1234ABCD Local>> DEFINE IPX FRAME 802.2 ENABLED Local>> DEFINE IPX NETRANGE 100 Local>> DEFINE PORT 2 AUTOSTART ENABLED Local>> DEFINE PORT 2 PPP DEDICATED Local>> INITIALIZE DELAY 0 |
The leased line is connected to port 2 of the LRS.
Figure 6-23: Los Angeles LRS Configuration
| Local>> DEFINE IPX ROUTING ENABLED Local>> DEFINE IPX FRAME 802.2 NETWORK FED Local>> DEFINE IPX FRAME 802.2 ENABLED Local>> DEFINE IPX NETRANGE 200 Local>> DEFINE PORT 2 AUTOSTART ENABLED Local>> DEFINE PORT 2 PPP DEDICATED Local>> INITIALIZE DELAY 0 |
Figure 6-24: LAN to LAN Connection Between Irvine and Dallas
The following commands must be used to create the filter list:
Figure 6-25: Creating the Filter List
| Local>> DEFINE FILTER texasfilt CREATE Local>> DEFINE FILTER texasfilt ADD ALLOW IPX SNET 0xffffffff 0x1234abcd Local>> DEFINE FILTER texasfilt ADD ALLOW IPX DSOCK EQ RIP Local>> DEFINE FILTER texasfilt ADD ALLOW IPX DSOCK EQ SAP Local>> DEFINE FILTER texasfilt ADD ALLOW IPX TYPE RIP Local>> DEFINE FILTER texasfilt ADD ALLOW IPX TYPE SAP Local>> SAVE FILTER texasfilt |
Figure 6-26: Associating the Site with the Filter List
| Local>> DEFINE SITE dallas FILTER OUTGOING texasfilt |
For complete filter list configuration instructions, see Packet Filters and Firewalls.
In the Error Reasons field, a hexadecimal value may be displayed. To determine the error, translate the error code to binary digits, note which bits are set and consult Table 6-1.
Table 6-1: NetWare Error Codes
| Bit Set | Error | Remedy (if any) |
|---|---|---|
| 0 | The LRS received a packet for an unknown IPX protocol. The packet was discarded. | This is a minor error; no correction is necessary. |
| 1 | The LRS received a packet for an unknown socket. The packet was discarded. | This is a minor error; no correction is necessary. |
| 2 | The LRS couldn't attach to the print queue on the NetWare file server. If the LRS cannot attach to the file server, the print queue cannot be provided as an LRS service. | Try deleting and recreating the print queue. Ensure that the LRS and the service on the LRS are in the print queue's "Print Servers" list. |
| 3 | The LRS couldn't connect to a file server. | Check the number of licenses; ensure that enough licenses are available. Check the file server's security configuration. |
| 4 | The LRS couldn't log out of the file server. | |
| 5 | The LRS couldn't get its credentials from the file server. Obtaining credentials is part of the file server login process. If the LRS doesn't receive credentials, the login will fail. | Try deleting and recreating the print queue and print servers. |
| 6 | The file server didn't accept the LRS credentials. This error may occur when the LRS login password has been changed, and doesn't match the print server password on the file server.
| Try deleting and recreating the print queue and print servers. Also, ensure that the LRS login password matches the print server password. To change the login password, see Login Password. If the LRS login password has not been changed from the default login password (access), a password is not required to log into the print server. Ensure that the print server has not been issued a password. |
| 7 | The LRS couldn't log into the file server. | The file server's login slots may be full; ensure that there is an adequate number of licenses. |
| 8 | The check membership call failed. When the LRS scans for print queues, it checks the membership of various objects. | This is a minor error; no correction is necessary. |
| 9 | The LRS couldn't map user to trustee.
| Try deleting and recreating the print queue and print servers, and recreating them. Also, ensure that the LRS login password matches the print server password. To change the login password, see Login Password. If the LRS login password has not been changed from the default login password (access), a password is not required to log into the print server. Ensure that the print server has not been issued a password. |
| 10 | The LRS couldn't attach to the print queue on the NetWare file server. If the LRS cannot attach to the file server, the print queue cannot be provided as an LRS service. | Try deleting and recreating the print queue. Ensure that the LRS and the service on the LRS are in the print queue's "Print Servers" list. |
| 11 | The LRS couldn't service the print queue or couldn't read the job. | Try clearing the jobs from the print queue and resubmitting them. |
| 12 | The LRS couldn't open a file on the file server. | Make sure the file exists and is located in the login directory of the file server's sys drive (e.g. f:\login). This bit gets set when using the source command if the LRS can't read the file. |
The rightmost bit is bit zero. Bits 13 and above are currently unused.An error code may denote multiple errors. For example, a hexadecimal value of 000043 translates to 0000 0000 0000 0000 0100 0011 in binary digits. In this case, bits 0, 1, and 6 are set, representing three different errors.
Table 6-2: Troubleshooting
| Problem | Possible Causes | Remedies |
| No packets are transferred, even though no settings have been adjusted. | The LRS is not connected properly. There is a duplicate internal network number on the network. | Ensure that all physical connections to and from the LRS are secure. Check the internal network numbers of all IPX nodes to ensure that there is not a duplicate. If there is, change the LRS's internal network number. No two IPX nodes can have the same internal network number |
| Packets are transferred between some but not all nodes on the network. | The LRS cannot communicate with either the source or destination IPX address. Internal routing has been turned off. If more than one frame type is enabled, internal routing should also be enabled. | Ensure that the frame type(s) of both the origination node and destination node are enabled. Re-enable any frame types necessary. Enable internal routing. |
| IPX Address Assignment | |||
| To | Use This Command | Example(s) | What Example Does |
| Specify the Base Number of the IPX Netrange | Set/Define IPX Netrange | DEFINE IPX NETRANGE 0x100
| Defines 0x100 as the base number of the LRS netrange. Each LRS port will be assigned an IPX network number equal to the sum of 0x100 and the port number. On the LRS16, this netrange is 0x101 to 0x110. For more information, see IPX Address Assignment. |
| Routing | |||
| To | Use This Command | Example(s) | What Example Does |
| Display the Current IPX Configuration | Show/Monitor/List IPX | SHOW IPX | Displays information about IPX RIP, SAP, frame types, and whether IPX routing is enabled or disabled. For more information, see Ethernet Interface. |
| Enable IPX Routing | Set/Define IPX Routing | DEFINE IPX ROUTING ENABLED
| Enables the LRS to route IPX packet traffic. For more information, see Ethernet Interface. |
| Configure the Ethernet Frame Type and Network Number | Set/Define IPX Ethernet | DEFINE IPX ETHERNET FRAME 802.2 NETWORK abcd DEFINE IPX ETHERNET FRAME 802.2 ENABLED | Enables frame type 802.2 on Ethernet abcd. For more information, see Ethernet Interface. |
| Routing, cont. | |||
| To | Use This Command | Example(s) | What Example Does |
| Verify the Current IPX Frame Type and Network Number | Show/Monitor/List IPX Interface | SHOW IPX INTERFACE 802.2
| Displays the active IPX routing interfaces. For more information, see Ethernet Interface. |
| Define a Static Route | Set/Define IPX Route | DEFINE IPX ROUTE 1234 NEXTROUTER 45af-00-00-ab-12-e2-38 | Specifies that the route to network 1234 is through router 45af-00-00-ab-12-e2-38. For more information, see Statically Added Entries. |
| DEFINE IPX ROUTE 1234 SITE dallas 2 50 | Specifies that the route to network 1234 is through site "dallas". | ||
| Define a Static Service | Set/Define IPX Service | DEFINE IPX SERVICE frank 4 12ab 00-00-00-00-00-01 451 | Creates a static service named "frank". This service is on network 12ab, node 00-00-00-00-00-01, socket 451. It is a type 4 service. For more information, see Statically Added Entries. |
| Disable RIP or SAP | See RIP and SAP. | ||
| Configure Keepalive Spoofing | See Spoofing. |
LRS Reference Manual - 4 MARCH 1996
Generated with Harlequin WebMaker