


LRS Reference Manual
To execute commands when a user logs into the LRS, complete the following steps.
1. Ensure that authentication databases have been configured using the Set/Define Authentication command.
2. Associate commands with a username by entering the Set/Define Authentication User Command command. When the user is successfully authenticated, these commands will be executed.
Figure 4-1: Restricting User to Particular Site
| Local>> DEFINE AUTHENTICATION USER bob COMMAND set ppp dialin_users |
See Chapter 11 - Security for a comprehensive discussion of authentication.
Filters are organized into ordered filter lists, referenced by name. For example, a filter named firewall may permit forwarding of packets that match a particular IP rule, but deny passage to packets that match a generic rule.
Filter lists are associated with sites. Sites use filter lists for the following purposes:
Table 4-1: Types of Filter Lists
| Type of Filter List | Purpose |
|---|---|
| Idle | Determines whether the site will remain active. Packets that pass the filter will reset the site's idle timer, preventing the site from being timed out. |
| Incoming | Determines whether to forward incoming packets received from a remote site. Packets that pass the filter will be forwarded. |
| Outgoing | Determines whether to forward outgoing packets to a remote site. Packets that pass the filter will be forwarded. |
| Startup | Determines whether a site will initiate a connection to a remote site. When a packet passes the filter, the LRS will initiate an outgoing connection. (If an outgoing connection currently exists, this filter will be ignored). |
The order that filters appear in a list is very important. For example, consider the following filter list:
Switching the order of the filters has a significant effect. Examine the filter list below, where the order of the above two filters is reversed:
To prevent all packet traffic from a particular protocol (for example, all IP packets), filter lists do not need to be used. Use the Define Site IP/IPX Disabled command:
Figure 4-2: Preventing IPX Packet Traffic
| Local>> DEFINE SITE irvine IPX DISABLED |
For a complete explanation of filter rules, see Packet Filters and Firewalls.
To disable RIP on a particular site, use the following command:
| Local>> DEFINE SITE irvine IP RIP DISABLED |
To configure the update interval, use the Define Site IP RIP Update command. The interval must be specified in seconds; intervals between 10 and 255 seconds are permitted.
Figure 4-4: Adjusting RIP Update Interval
| Local>> DEFINE SITE irvine IP RIP UPDATE 60 |
When a router determines a route to a particular destination, a route with a lower cost is more likely to be included in the route. Configuring a higher RIP cost on a particular site makes the interface a less desirable route to other destinations.
To set the a site's IP RIP metric, use the Define Site IP RIP Metric command.
Figure 4-5: Configuring a Site's RIP Metric
| Local>> DEFINE SITE irvine IP RIP METRIC 4 |
If IP RIP sending is disabled on a site, the Update and Metric values will be ignored.
To disable IP header compression, use the following command:
Figure 4-6: Disabling IP Header Compression
| Local>> DEFINE SITE irvine IP COMPRESS DISABLED |
For complete IP configuration instructions, see Chapter 5 - IP.
When a new site is created, RIP and SAP Listen and Update are enabled. During connections controlled by this site, the LRS will listen to RIP and SAP packets and will send RIP and SAP updates when information has changed. In some situations (for example, to reduce network traffic), RIP and/or SAP should be disabled.
To edit a site's RIP or SAP configuration, use the Define Site IPX RIP/SAP command. Figure 4-7 displays some examples.
Figure 4-7: RIP and SAP Configurations
| Local>> DEFINE SITE irvine IPX RIP SEND ENABLED Local>> DEFINE SITE irvine IPX SAP LISTEN DISABLED |
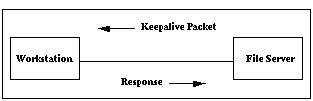
When an LRS is used to connect a remote workstation to a file server, or to connect two networks, the keepalive packet traffic may keep a connection active when there isn't any interactive traffic. For example, if a keepalive packet destined for a remote workstation is routed through the LRS, the LRS will bring up a connection to the workstation to forward the packet if a connection isn't currently in place.
To reduce the cost of initiating connections simply for keepalive packet traffic, the LRS can be configured to send these packets and responses to and from the file server and workstation, or between two file servers. This is called spoofing.
In the remote node case, the file server will send keepalive packets and responses for both file servers (if two file servers are connected) or for the file server and workstation. This enables the link between the LRS and the remote host to remain idle until there is interactive packet traffic. Figure 4-9 displays an example.
Figure 4-9: LRS Spoofing For Workstation

Figure 4-10 displays a LAN to LAN spoofing example, where two LRSs are connected. In this case, the servers send the keepalive packet and the response for the workstation and file server; the keepalive traffic is never transmitted across the link between the two servers.
Figure 4-10: Spoofing in LAN to LAN Connection
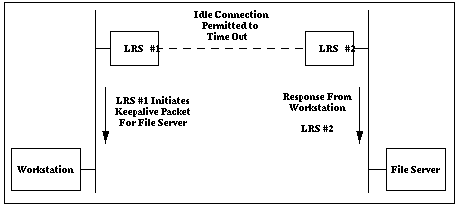
If LRS #1 does not hear from the workstation within a set time period, it will assume that the workstation is no longer connected. It will then initiate a connection to LRS #2 and inform the server that it should stop spoofing the workstation's response to the file server.
Spoofing is enabled by default. To disable spoofing, use the Define Site IPX Keepalive command.
Figure 4-11: Disabling IPX Spoofing
| Local>> DEFINE SITE irvine IPX KEEPALIVE DISABLED |
Figure 4-12: Disabling IPX Header Compression
| Local>> DEFINE SITE irvine IPX COMPRESS DISABLED |
For a complete discussion of IPX routing, refer to Chapter 6 - IPX.
For example, the LRS might log into a remote site that has a login program. Using a chat script defined for the site, the LRS could send carriage returns until the login prompt is returned, send a username, wait for the password prompt, or send a password.
For example, to configure the script to send or expect strings, use the following command:
Figure 4-13: Sending and Expecting Strings
| Local>> DEFINE SITE irvine CHAT SEND "hello?" Local>> DEFINE SITE irvine CHAT EXPECT "login:" |
Figure 4-14: Editing Script Entries
| Local>> DEFINE SITE irvine CHAT REPLACE 1 EXPECT "login:" Local>> DEFINE SITE irvine CHAT DELETE 4 Local>> DEFINE SITE irvine CHAT AFTER 3 EXPECT "login:" Local>> DEFINE SITE irvine CHAT BEFORE 3 EXPECT "login:" |
Figure 4-15: Setting Timeouts and Delays
| Local>> DEFINE SITE irvine CHAT TIMEOUT 2 EXPECT "login:" Local>> DEFINE SITE irvine CHAT TIMEOUT 4 SEND "hello?" |
The second command in Figure 4-15 will send the "hello?" string after a 4-second delay.
The default Send timeout (delay before a Send command is executed) is 0; in other words, strings will be sent right away. The default timeout for Expect commands is 30 seconds.
Figure 4-16: Sample Chat Script
| Local>> DEFINE SITE irvine CHAT TIMEOUT 4 FAIL Local>> DEFINE SITE irvine CHAT SEND "" Local>> DEFINE SITE irvine CHAT TIMEOUT 2 EXPECT "login:" |
To avoid congestion, the LRS enables you to customize a site's use of bandwidth. As it is needed, additional bandwidth will be added. When it is no longer needed, the bandwidth will be removed.
Some protocols can detect congestion and will avoid it by sending smaller amounts of data at one time.
The initial bandwidth allotted to the site may also be configured. This is optional.These thresholds at which bandwidth is added and removed should have some room between them. This will regulate the frequency at which bandwidth is added and removed. It is recommended to set the "add bandwidth" threshold to a percentage between 80 and 100 percent; the "remove bandwidth" threshold should generally bet set to less than 50%. If the threshold values are set too close to one another, the connections will thrash; in other words, bandwidth will be continuously added and dropped.
The order in which ports are selected to be added and removed is controlled by a priority setting; when additional bandwidth is needed, ports with the highest priority are the first to be added and the last to be removed.
Bandwidth is controlled by the host that initiates the call. If the LRS initiates a call, it controls the bandwidth for each site. If the LRS receives an incoming call, the bandwidth is controlled by the remote host.
The LRS will always use at least one port for a connection, even if the traffic is below the "remove bandwidth" threshold. If this is not desired behavior, the last connection can be controlled by the idle timer.
To configure the idle timer, see Set/Define Server Inactivity Limit.
The LRS will truncate the bandwidth setting to the nearest 100 bits per second. For example, a setting of 57590 will be truncated to 57500.
Consider the following example. Site irvine may use LRS port 2 and port 3 (if needed) for connections. A V.34 modem with a baud rate of 28800 bits per second is attached to each port. The remote modems are also V.34 modems with the same baud rate. Compression is enabled and a 2:1 compression rate is expected, which will increase the data transfer between the modems to 57600 bits per second.
The bandwidth for ports 2 and 3 should be estimated as follows:
Figure 4-17: Estimating a Port's Bandwidth
| Local>> DEFINE SITE irvine PORT 2 BANDWIDTH 57600 Local>> DEFINE SITE irvine PORT 3 BANDWIDTH 57600 |
It is important to make bandwidth estimates correctly. The LRS will attempt to reduce the total number of ports in use by using higher bandwidth ports (of the same priority) first until the bandwidth goal is met.
To assign priority numbers to a site's ports, use the following command:
Figure 4-18: Assigning Priority Numbers
| Local>> DEFINE SITE irvine PORT 2 PRIORITY 2 |
By default, all ports are assigned a priority of 1.
Figure 4-19: Specifying Measurement Period
| Local>> DEFINE SITE irvine BANDWIDTH PERIOD 60 |
Figure 4-20: Determining When Bandwidth Will Be Added/Removed
| Local>> DEFINE SITE irvine BANDWIDTH ADD 90 Local>> DEFINE SITE irvine BANDWIDTH REMOVE 40 |
The holddown timer helps to limit the "thrashing" caused by rapid adjustments in bandwidth. When the holddown timer is used in conjunction with a short bandwidth measurement period, the site will respond quickly to initial changes in packet traffic without thrashing.
To configure the holddown timer, use the Define Site Bandwidth Holddown command:
Figure 4-21: Configuring the Holddown Timer
| Local>> DEFINE SITE irvine BANDWIDTH HOLDDOWN 30 |
Figure 4-22: Specifying Maximum Bandwidth
| Local>> DEFINE SITE irvine BANDWIDTH MAXIMUM 115200 |
Figure 4-23: Current Bandwidth Settings
| Local>> LIST SITE irvine BANDWIDTH LRS2 Version B1.1/101 Name: LRS_0C0021 Hardware Addr: 00-80-a3-0c-00-21 Uptime: 1 Day 02:56 Site Name: irvine Period: 60 Add @ Utilization: Disabled Remove @ Utilization: Disabled Maximum Bandwidth: 100 Initial Bandwidth: 100 Multilink: Disabled Hold Down Timer: 01:00 Input Utilization: 0% Output Utilization: 0% Next Adjust Up: Any Time Next Adjust Down: Any Time Target Bandwidth: 0 Waiting Bandwidth: 0 Online Bandwidth: 0 Average Period -- Input -- -- Output -- - Dropped - (in seconds) Bytes/Second Bytes/Second Bytes/Second Site Total: 4 0 0 0 Site Total: 60 0 0 0 |
Figure 4-24: Restoring Default Bandwidth Values
| Local>> DEFINE SITE irvine BANDWIDTH DEFAULT |
The disadvantage of compression is increased latency, the time required to transfer data from one place to another. Compression increases latency due to the time required to compress the data before it is sent. Error correction can also increase latency, as the data must be checked for integrity before it is transmitted.
For a complete discussion of compression and error correction, see Chapter 9 - Modems.In situations where the delay is annoying (for example, during interactive use over a long distance line), compression and error correction should not be used. These options are enabled by default on the LRS; to disable them, use the following commands:
Figure 4-25: Disabling Error Correction and Compression
| Local>> DEFINE PORT 2 MODEM ERRORCORRECTION DISABLED Local>> DEFINE PORT 2 MODEM COMPRESSION DISABLED |
How "aggressively" a site will add bandwidth can be controlled with two factors: the period during which the use of bandwidth is measured, and the percentage at which additional bandwidth is added.
For example, to increase bandwidth when a small (not necessarily continuous) increase in traffic is detected, the measurement time period should be reduced. A similar effect could be obtained by reducing the percentage utilization at which bandwidth is increased. To require a sustained increase in traffic to increase bandwidth, the measurement time period and the utilization percentage should be increased. See Bandwidth On Demand for more information.
When IP or IPX headers are compressed, the LRS replaces the packet's header information with a slot number. This number is assigned dynamically, and denotes that the packet originated from a particular connection (for example, a Telnet session). When the destination receives the packet, it will decompress the header, replacing the representative slot number with the complete header information.
Header compression is most useful for interactive traffic, for example, Telnet sessions. Compressing the header information for interactive traffic decreases the delay before data is transferred. In other words, if a key is pressed at a Telnet session, the time required to echo that character back to the user's terminal will be reduced.
The time required to send data from one place to another is called latency.To use header compression, the number of slots (connections) supported on a site must be configured. This number should be slightly above the anticipated number of connections; in the event that a higher than expected number of connections are made, additional slots will be available for these connections.
To configure IP header compression, see Header Compression. To configure IPX header compression, see Header Compression.
The LRS uses Van Jacobson TCP compression, discussed in RFC 1144.
Figure 4-26: Setting Site Idle Time
| Local>> DEFINE SITE irvine IDLE 600 |
Idle time filter lists enable the LRS to keep a site active for specific types of traffic, disconnecting the site if this traffic isn't received. For example, imagine that a particular site was intended for interactive traffic. Using an idle filter list, the site could ensure that other traffic (for example, email) wouldn't keep the connection active.
To configure an idle time filter list, see Filter Lists.
Startup filter lists are only intended to prevent unwanted connections. If a connection is already in place, the list will be ignored. To configure a startup filter list, see Filter Lists.
Figure 4-27: Adding Time Ranges
| Local>> DEFINE SITE irvine TIME ADD MON 8:00 17:00 Local>> DEFINE SITE irvine TIME ADD TUES 23:00 WED 6:00 Local>> DEFINE SITE irvine TIME ADD WED 8:00 THURS 8:00 |
Up to 10 time ranges may be specified.Specify whether connections will be permitted or prevented during these times using the Define Site Time Default command. A setting of enabled will permit connections to the site during the time ranges; disabled will prevent any connections.
Figure 4-28: Enabling Connections During Time Range
| Local>> DEFINE SITE irvine TIME DEFAULT ENABLED |
To configure an IP timeserver, see Set/Define IP Timeserver. To configure an IPX timeserver, see Set/Define IPX Timeserver. To set the LRS internal clock, see Set/Define Server Clock. The LRS time zone must also be configured. See Set/Define Server Timezone.
To display the site restrictions you've configured, use the List Site Time command:
Figure 4-29: Displaying Site Restrictions
| Local>> LIST SITE irvine TIME LRS16 Version B1.1/102int(951128) Name: DOC_SERVER Hardware Addr: 00-80-a3-0b-00-5b Uptime: 3 Days 02:07 20:42:54 Access default: Enabled
01) Mon 08:00 - Mon 17:00 Disabled 02) Tue 23:00 - Wed 06:00 Disabled 03) Wed 08:00 - Thu 08:00 Disabled
Success Timeout: 0:01 Failure Timeout: 0:30 |
Another way to reduce cost is to increase the percentage utilization required to add additional connections. If a site is permitted to use up to 80% of the total currently-dialed bandwidth on a particular port (rather than, for example, 25%), the site will be less likely to require additional connections to increase bandwidth.
| Direct connections | When two LRSs are linked with a serial cable, there is a direct connection in place. |
| Statistical multiplexors | Multiplexors (stat-mux) allow multiple serial lines to run over a single leased line. The stat-mux must support asynchronous serial communication. |
| Synchronous leased lines | Synchronous lines are leased from the telephone company and dedicated to synchronous serial communication between two fixed locations. |
| Analog leased lines | Analog lines are ordinary telephone lines leased from the telephone company and used in conjunction with standard modems. The modems must have leased line capabilities. |
Chat scripts are described in Chat Scripts.The LRS assumes an 8-bit data path. If you are using SLIP, all characters must be sent and received unchanged by the intervening communications equipment. PPP has a feature called ACCM which causes the LRS to avoid sending user-specified control characters. If the equipment connecting the LRS cannot send certain control characters, configure PPP and ACCM on the LRS port.
ACCM is discussed in detail in Character Escaping.
See your modem's documentation to configure the modem for leased line mode.
The following configuration is recommended:
In the following examples (both SLIP and PPP), the LRS has an IP address of 192.0.1.1, and must connect to another router with IP address 192.99.99.99.
Figure 4-30: LRS Configuration Without Modems: PPP
| Local>> DEFINE IPX ROUTING ENABLED Local>> DEFINE IP IPADDRESS 192.0.1.1 Local>> DEFINE PORT 2 ACCESS DYNAMIC Local>> DEFINE PORT 2 SPEED 19200 Local>> DEFINE PORT 2 FLOW CONTROL CTS Local>> DEFINE PORT 2 AUTOSTART ENABLED Local>> DEFINE SITE port2 IDLE 0 |
Figure 4-31: Configuring Static Routing
| Local>> DEFINE SITE port2 IP RIP DISABLED Local>> DEFINE SITE port2 IPX RIP DISABLED Local>> DEFINE SITE port2 IPX SAP DISABLED Local>> DEFINE SITE IP ROUTE 192.99.99.0 SITE port2 2 Local>> DEFINE IPX ROUTE 12ab SITE port2 |
Figure 4-32: LRS Configuration Without Modems: SLIP
| Local>> DEFINE IP IPADDRESS 192.0.1.1 Local>> DEFINE PORT 2 ACCESS DYNAMIC Local>> DEFINE PORT 2 SPEED 19200 Local>> DEFINE PORT 2 FLOW CONTROL CTS Local>> DEFINE PORT 2 SLIP DEDICATED Local>> DEFINE PORT 2 AUTOSTART ENABLED Local>> DEFINE SITE port2 PROTOCOL SLIP Local>> DEFINE SITE port2 IDLE 0 Local>> DEFINE SITE port2 IP REMOTEADDRESS 192.99.99.99 |
Figure 4-33: Configuring Static Routing
| Local>> DEFINE SITE port2 IP RIP DISABLED Local>> DEFINE IP ROUTE 192.99.99.0 SITE port2 2 |
Show/Monitor Site command is particularly useful when allotting bandwidth to a site. Periodically monitoring a site's use of bandwidth will enable you to determine if the bandwidth configuration is appropriate and to make adjustments when necessary.
Figure 4-34: Displaying Bandwidth Utilization
| Local>> SHOW SITE irvine BANDWIDTH |
For information on port and site states, see Table 3-3.
Figure 4-35: Creating a Chat Script
| Local>> DEFINE SITE irvine CHAT TIMEOUT 4 FAIL Local>> DEFINE SITE irvine CHAT SEND "" Local>> DEFINE SITE irvine CHAT EXPECT "login:" Local>> DEFINE SITE irvine CHAT SEND "user" Local>> DEFINE SITE irvine CHAT EXPECT "word:" Local>> DEFINE SITE irvine CHAT SEND "password" |
In this example, a network policy prevents all IP and IPX traffic, permitting only ICMP ping packets and email. Telnet connections are permitted to only one secure host (192.0.1.4) on the local network.
The LRS is calling site memphis. To configure the firewall between the LRS and memphis, IPX must be disabled.
Figure 4-36: Disabling IPX
| Local>> DEFINE SITE memphis IPX DISABLED |
Figure 4-37: Creating IP Filter
| Local>> DEFINE FILTER mem CREATE Local>> DEFINE FILTER mem ALLOW ICMP from ANY IP to ANY IP Local>> DEFINE FILTER mem ALLOW TCP port SMTP from ANY IP to ANY IP Local>> DEFINE FILTER mem ALLOW TELNET from ANY IP to 192.0.1.4 Local>> DEFINE FILTER mem DENY all |
For a complete discussion of filter lists, see Packet Filters and Firewalls.Finally, the mem filter list must be associated with site memphis as an incoming filter list.
Figure 4-38: Assigning mem Filter List to Site memphis
| Local>> DEFINE SITE memphis FILTER INCOMING mem |
For a more complex firewall example, see Creating a Firewall.
| Security | |||
| To | Use This Command | Example(s) | What Example Does |
| Restrict Users to Particular Configuration | Set/Define Authentication User Command | DEFINE AUTHENTICATION USER bob COMMAND set ppp dialin_users | When user "bob" logs in, PPP is automatically started, and he is attached to site "dialin_users". See Authentication or Forcing Execution of Commands for more information. |
| Filter Packet Traffic | 1. Set/Define Filter | DEFINE FILTER firewall ADD 1 DENY IP SRC 192.0.1.0 255.255.255.0 | Creates a filter list named "firewall". The "Add" parameter adds 1 rule to the list; all IP packets originating from host 192.0.1.0 are denied passage through the LRS. See Filter Lists or Packet Filters and Firewalls for more information. |
| 2. Define Site Filter Idle
| DEFINE SITE irvine FILTER IDLE firewall | When an LRS connection using site "irvine" receives packet traffic, it's compared to filter "firewall". If the traffic is permitted passage, it resets "irvine's" idle timer, preventing the site from timing out and disconnecting. | |
| or Define Site Filter Incoming | DEFINE SITE irvine FILTER INCOMING firewall | When an LRS connection using site "irvine" receives incoming packet traffic, it is compared to filter "firewall". If the traffic does not pass the filters in "firewall", it is discarded. | |
| or Define Site Filter Outgoing | DEFINE SITE irvine FILTER OUTGOING firewall | When an LRS connection using site "irvine" attempts to forward outgoing packet traffic, it is compared to filter "firewall". If the traffic does not pass the filters in "firewall", it is discarded. | |
| Security, cont. | |||
| To | Use This Command | Example(s) | What Example Does |
| or Define Site Filter Startup | DEFINE SITE irvine FILTER STARTUP firewall | When the LRS receives packet traffic destined for site "irvine", it's compared to filter "firewall". If the traffic is permitted passage, the LRS will initiate a connection to the remote host using "irvine". | |
| Prevent all IP/IPX Packet Traffic from Being Forwarded | Define Site IP Disabled or Define Site IPX Disabled | DEFINE SITE irvine IPX DISABLED | Prevents IPX packets from being forwarded when site "irvine" is used. See Preventing all IP or IPX Traffic for more information. |
| Restrict Incoming Callers to a Particular IP Address or Range of Addresses | See Remote Networking IP Address Assignment | ||
| IP Configuration | |||
| To | Use This Command | Example(s) | What Example Does |
| Assign a Unique IP Address to a Site | Define Site IP Address | DEFINE SITE irvine IP ADDRESS 192.0.1.220 | Assigns the IP address 192.0.1.220 to "irvine's" IP interface. See Specifying Specific IP Address for a Site for more information. |
| Disable RIP | Define Site IP RIP Disabled | DEFINE SITE irvine IP RIP DISABLED | Disables RIP sending and listening for site "irvine". See Disabling RIP or RIP for more information. |
| Adjust the Interval Between RIP Updates | Define Site IP RIP Update | DEFINE SITE irvine IP RIP UPDATE 60 | Sets "irvine's" interval between RIP updates to 60 seconds. See Interval Between RIP Updates or RIP for more information. |
| IP Configuration, cont. | |||
| To | Use This Command | Example(s) | What Example Does |
| Make a Site a More or Less Desirable Route to Other Destinations | Define Site IP RIP Metric | DEFINE SITE irvine IP RIP METRIC 4
| Sets "irvine's" RIP metric to 4. The higher the metric value, the less desirable the site is as a route to other destinations. See Configuring the Metric or RIP for more information. |
| Enable or Disable IP Header Compression | Define Site IP Compress | DEFINE SITE irvine IP COMPRESS DISABLED | Disables IP header compression for site "irvine". See Header Compression for more information. |
| IPX Configuration | |||
| To | Use This Command | Example(s) | What Example Does |
| Configure RIP or SAP | Define Site IPX RIP/SAP | DEFINE SITE irvine IPX RIP SEND DEFINE SITE irvine IPX SAP DISABLED | Site "irvine" will forward IPX RIP packets. Disables IPX SAP on site "irvine". See RIP and SAP or RIP and SAP for more information. |
| Disable "Spoofing" of Keepalive Packets and Responses | Define Site IPX Keepalive Disabled | DEFINE SITE irvine IPX KEEPALIVE DISABLED | Disables keepalive spoofing on site "irvine". See Spoofing for more information. |
| Enable or Disable IPX Header Compression | Define Site IPX Compress | DEFINE SITE irvine IPX COMPRESS DISABLED | Disables IPX header compression for site "irvine". See Header Compression for more information. |
| Chat Scripts | |||
| To | Use This Command | Example(s) | What Example Does |
| Send a String to the Remote Host | Define Site Chat Send | DEFINE SITE irvine CHAT SEND "hello?" | On outgoing connections, "irvine" will send the string "hello?" to the remote host. See Creating a Chat Script for more information. |
| Expect a String From the Remote Host | Define Site Chat Expect | DEFINE SITE irvine CHAT EXPECT "login:" | On outgoing connections, "irvine" will expect the string "login:" from the remote host. See Creating a Chat Script for more information. |
| Configure a Timeout Period in the Script | Define Site Chat Timeout.
| DEFINE SITE irvine CHAT TIMEOUT 2 EXPECT "login:" | On outgoing connections, "irvine" will wait 2 seconds to receive the string "login:" from the remote host. After 2 seconds, if the string hasn't been received, the next line of the script will be executed. See Configuring Timeouts for more information. |
| Determine When a Chat Script Will "Give Up" | Define Site Chat Fail.
| DEFINE SITE irvine CHAT TIMEOUT FAIL 4 DEFINE SITE irvine CHAT AFTER 1 SEND "hello?" DEFINE SITE irvine CHAT AFTER 2 TIMEOUT 2 EXPECT "login:" | In this chat script, "irvine" will send a "hello" string, and wait 2 seconds to receive a "login:" string from the remote host. If the string isn't received within 2 seconds, the script will loop, and the "hello?" string will be sent again. The script may execute a total of four times. If the "login:" string isn't received on the fourth attempt, the script will fail completely. See Setting Markers for more information. |
| Add, Replace, or Delete Script Entries | Define Site Chat Replace/Before/After/Delete | DEFINE SITE irvine CHAT REPLACE 1 EXPECT "login:" DEFINE SITE irvine AFTER 3 EXPECT "login:" | Replaces line 1 of the script with "Expect 'login:'". Inserts "Expect 'login:'" after line 3 of the script. See Editing and Adding Entries for more information. |
| Configuring LAN to LAN Bandwidth | |||
| To | Use This Command | Example(s) | What Example Does |
| Assign a Priority Number to Each Port | Define Site Port Priority | DEFINE SITE irvine PORT 2 PRIORITY 5 | When site "irvine" is used, port 2 will have priority 5. The port with the highest priority number will be used first for outgoing calls; if additional bandwidth is needed, ports will be used in descending priority order. See LAN to LAN Connections or Assigning Port Priority Numbers for more information. |
| Estimate the Bandwidth of Each Port | See Estimating Each Port's Bandwidth. | ||
| Specify the Period During Which Bandwidth Will Be Measured | Define Site Bandwidth Period | DEFINE SITE irvine BANDWIDTH PERIOD 60 | When site "irvine" is used, the bandwidth usage will be measured during 60-second periods. See LAN to LAN Connections or Specifying the Bandwidth Measurement Period for more information. |
| Configure the Initial/Maximum Bandwidth Allotted to a Site | Define Site Bandwidth Initial/Maximum | DEFINE SITE irvine BANDWIDTH MAXIMUM 500 | Sets "irvine's" maximum bandwidth value to 500 bytes per second. If bandwidth needs to be added during a connection, it may be added until it reaches this value. See LAN to LAN Connections or Configuring the Maximum Bandwidth Allotted to a Site for more information. |
| Control When Bandwidth is Added or Removed | Define Site Bandwidth Add/Remove | DEFINE SITE irvine BANDWIDTH ADD 90 DEFINE SITE irvine BANDWIDTH REMOVE 40 | "Irvine's" bandwidth use will be measured (see Define Site Bandwidth Period, above). If "irvine" is using at least 90% of its currently-dialed bandwidth, additional bandwidth will be added. If it's using less than 40% of its currently-dialed bandwidth, bandwidth will be removed. See LAN to LAN Connections or Specifying when Bandwidth is Added or Removed for more information. |
| Configuring LAN to LAN Bandwidth, cont. | |||
| To | Use This Command | Example(s) | What Example Does |
| Display a Site's Current Bandwidth Configuration | Show/Monitor/List Sites Bandwidth | LIST SITE irvine BANDWIDTH | Displays "irvine's" current bandwidth settings. See LAN to LAN Connections or Monitoring Networking Activity for more information. |
| Restore a Site's Default Bandwidth Settings | Define Site Bandwidth Default | DEFINE SITE irvine BANDWIDTH DEFAULT | Restores the factory default bandwidth settings for site "irvine". See LAN to LAN Connections or Restoring Default Bandwidth Settings for more information. |
| Improving Performance | |||
| To | Use This Command | Example(s) | What Example Does |
| Filter Unwanted Packet Traffic | See Filter Packet Traffic . | ||
| Increase Throughput Using Data Compression | Define Port Modem Compression Enabled | DEFINE PORT 2 MODEM COMPRESSION ENABLED | Enables data compression on port 2. See Throughput vs. Latency for more information. |
| Decrease Latency By Disabling Error Correction | Define Port Modem Errorcorrection Disabled | DEFINE PORT 2 MODEM ERRORCORRECTION DISABLED | Disables automatic error correction on port 2. See Throughput vs. Latency for more information. |
| Improving Performance, cont. | |||
| To | Use This Command | Example(s) | What Example Does |
| Decrease Latency By Disabling Data Compression | Define Port Modem Compression Disabled | DEFINE PORT 2 MODEM COMPRESSION DISABLED | Disables data compression on port 2. See Throughput vs. Latency for more information. |
| Decrease Latency By Enabling IP/IPX Header Compression | Define Site IP CompressDefine Site IPX Compress Disabled | DEFINE SITE irvine IP COMPRESS DISABLED | Disables IP header compression on site "irvine". See Header Compression for more information. |
| Increase Throughput By Adding Bandwidth | See "Configuring LAN to LAN Bandwidth". | ||
| Reducing Cost | |||
| To | Use This Command | Example(s) | What Example Does |
| Configure Site Inactivity Logouts | 1. Define Site Idle | DEFINE SITE irvine IDLE 600 | Sets a maximum idle time of 600 seconds for site "irvine". See Inactivity Logouts for more information. |
| 2. See Define Site Filter Idle | |||
| Prevent Unwanted Packets From Initiating a Connection | See Define Site Filter Startup. | ||
| Reducing Cost, cont. | |||
| To | Use This Command | Example(s) | What Example Does |
| Reduce Phone Rates by Reducing the Number of Ports Used for a Connection | Purge Site Port | PURGE SITE IRVINE PORT 3 | Removes port 3 from site "irvine". When "irvine" makes a connection, port 3 will no longer be used. See Reducing Number of Ports Used for more information. |
| Reduce Transfer Time by Using Higher Speed Modems | See Using Higher Speed Modems. | ||
| Restrict Connections to Particular Times | 1. Define Site Time Add | DEFINE SITE irvine TIME ADD MON 8:00 17:00
| Adds a time range; the range is from Monday at 8:00 a.m. to Monday at 5:00 p.m. See Restricting Connections to Particular Times for more information. |
| 2. Define Site Time Default Enabled/Disabled | DEFINE SITE irvine TIME DEFAULT ENABLED DEFINE SITE irvine TIME DEFAULT DISABLED | Connections will be permitted during configured time ranges. Connections will be prevented during configured time ranges. | |
| Increase Requirement For Adding Bandwidth | See Increasing Requirements for Adding Additional Bandwidth. | ||
| Using the LRS Without Modems | |||
| To | Use This Command | Example(s) | What Example Does |
| Configure the Receiver of the Connection | Configured as if modems were used. | ||
| Configure the Initiator of the Connection | 1. Define Site Idle None | DEFINE SITE irvine IDLE NONE | Disables inactivity timeouts for site "irvine". See Configuration Issues for more information. |
| 2. Define Port PPP Dedicated or Define Port SLIP Dedicated | DEFINE PORT 2 PPP DEDICATED | Dedicates port 2 to PPP. | |
| 3. Set/Define Port Autostart Enabled | DEFINE PORT 2 AUTOSTART ENABLED | Configures port 2 to start automatically. Because it's dedicated to PPP, PPP will automatically start. | |
| 4. Set/Define Port Access Dynamic | DEFINE PORT 2 ACCESS DYNAMIC | Configures port 2 to support incoming and outgoing connections. | |
| 5. Define Port Modem Control Disabled | DEFINE PORT 2 MODEM CONTROL DISABLED | Disables modem control on port 2. | |
| 6. Define Site Port Telephone None | DEFINE SITE irvine PORT TELEPHONE NONE | Clears any currently-defined port telephone number. | |
| 7. Define Site Telephone None | DEFINE SITE irvine TELEPHONE NONE | Clears any currently-defined site telephone number. | |
| Monitoring Network Activity | |||
| To | Use This Command | Example(s) | What Example Does |
| Display a Site's Current Activity, Including its Use of Bandwidth | Show/Monitor/List Sites | SHOW SITE irvine BANDWIDTH | Displays bandwidth statistics for site "irvine". See Monitoring Networking Activity or Monitoring Networking Activity for more information. |
LRS Reference Manual - 4 MARCH 1996
Generated with Harlequin WebMaker