


LRS Reference Manual
Many port commands require that the Define command be used (rather than the Set command). For a comparison of the Set and Define commands, see Set and Define.
If you're entering a number of commands at once, you may wish to enable the Command Completion characteristic. When Command Completion is enabled, the LRS will complete partially-typed commands when the Space or Tab keys are pressed. This can save time and reduce errors if you're entering a number of commands.
Command Completion is disabled by default. To enable it, use the following command:
Figure 8-1: Enabling Command Completion
| Local>> DEFINE PORT 2 COMMAND COMPLETION ENABLED |
To Telnet from the network to an LRS port and dial out using an attached modem, the port must have dynamic or remote access. To log into a port locally and Telnet to a remote host, the port must have local or dynamic access.
To configure access to a port, use the Set/Define Port Access command.
Figure 8-2: Configuring Connection Type
| Local>> DEFINE PORT 2 ACCESS DYNAMIC |
A port's start-up procedure may involve a combination of factors. For example, if modem control is enabled, the port will wait until the modem asserts the DSR signal, then (depending on how the port was configured) it could either automatically start, or wait for character input before starting.
To enable Autostart, use the following command.
Figure 8-3: Enabling Autostart
| Local>> DEFINE PORT 2 AUTOSTART ENABLED |
To dedicate a port to a host or service, see Preferred/Dedicated Services and Protocols.If PPP is enabled on the port, it will start when a PPP packet is received. See PPP Mode for details.
In order for a port to wait for character input before starting, Autostart must be disabled. If Autostart is enabled, disable it using the Set/Define Port Autostart command.
Figure 8-4: Disabling Autostart
| Local>> DEFINE PORT 2 AUTOSTART DISABLED |
Enabling PPP or SLIP on the LRS serial console port is not recommended.By default, the LRS will wait for character input before starting ports, then when the Return or Line Feed key is pressed, the ports will be in character mode. To configure a port to run PPP or SLIP, see the sections below.
For information on Telnet or Rlogin, see Sessions.
When PPP and PPPdetect (see Automatic Protocol Detection) are enabled on a port, PPP will automatically run once a port's startup procedure (for example, waiting for character input) is complete and a PPP packet is received. Running PPP in this manner bypasses a port's usual authentication (using a login password or username/password combination); therefore, some type of PPP authentication should be used.
For information about ports' start-up procedures, refer to Starting a Port.To enable a port to run PPP, use the Set/Define Port PPP command.
| Local>> DEFINE PORT 2 PPP ENABLED |
For more information on PPP, refer to Chapter 7 - PPP.
Running SLIP in this manner bypasses a port's usual authentication system (login password, etc). As SLIP doesn't support authentication, no authentication will occur in this situation. To use authentication with SLIP, see Chapter 11 - Security.
To enable a port to run SLIP, use the following commands:
| Local>> DEFINE PORT 2 SLIP ENABLED |
In some situations, autodetection should be disabled. For example, SLIP doesn't support authentication. To authenticate users, autodetection of SLIP could be disabled; incoming callers would be presented with the Local> prompt and could be forced to enter the login password. Once authenticated, they could manually start SLIP by entering the Set SLIP command.
To configure SLIP authentication, see Chapter 11 - SecurityTo enable PPP autodetection, use the Set/Define Port PPPdetect command. Automatic detection of SLIP is configured with the Set/Define Port SLIPdetect command.
Figure 8-7: Enabling Automatic Protocol Detection
| Local>> DEFINE PORT 2 PPPDETECT ENABLED Local>> DEFINE PORT 3 SLIPDETECT ENABLED |
Session configurations may apply only to the current session, or to all sessions run on a particular port. Session-specific configurations meet needs that apply only to an active session; for example, if binary files were being transferred, interpretation of the switch characters, XON/XOFF flow control characters, and messages could be disabled.
Only one session at a time will be displayed.Port-specific session configurations include the number of sessions permitted on a port, the keys used to switch backward and forward between sessions, and the key used to exit from a session to character mode. The commands used to make these configurations are discussed in the following sections.
To change the session limit, use the Set/Define Port Session Limit command.
Figure 8-8: Changing Session Limit
| Local>> DEFINE PORT 2 SESSION LIMIT 6 |
The command used to switch to the previous session is Backwards. Its keyboard equivalent is called the backward switch. To define a backward switch, use the following command:
Figure 8-9: Defining Backward Switch
| Local>> DEFINE PORT 2 BACKWARD SWITCH ^O |
Figure 8-10: Specifying Forward Switch
| Local>> DEFINE PORT 2 FORWARD SWITCH ^N |
Figure 8-11: Specifying Local Switch
| Local>> DEFINE PORT 2 LOCAL SWITCH ' |
To configure the processing of the Break key, use the Set/Define Port Break command. Break can be set to one of the following: Local, Remote, or Disabled.
Figure 8-12: Configuring Break Key Processing
| Local>> DEFINE PORT 3 BREAK LOCAL |
Figure 8-13: Enabling Verification
| Local>> DEFINE PORT 3 VERIFICATION ENABLED |
To specify a preferred service, use the Set/Define Port Preferred command.
Figure 8-14: Specifying a Preferred Service
| Local> DEFINE PORT 2 PREFERRED SERVICE lrs_modem |
To automatically connect to the preferred service upon login to the port, the Autoconnect characteristic must be enabled. Use the following command:
Figure 8-15: Enabling Autoconnect
| Local>> DEFINE PORT 3 AUTOCONNECT ENABLED |
To specify a dedicated service, use the Define Port Dedicated command.
Figure 8-16: Specifying a Dedicated Service
| Local>> DEFINE PORT 2 DEDICATED lrs_modem |
To dedicate a port to PPP or SLIP, use the following command:
Figure 8-17: Dedicating a Port to PPP/SLIP
| Local>> DEFINE PORT 2 PPP DEDICATED Local>> DEFINE PORT 3 SLIP DEDICATED |
If you cannot log into the LRS, you'll need to initialize the server, restoring factory default settings. See Initialize Server.
Figure 8-18: Specifying a Preferred/Dedicated Telnet Host
| Local>> DEFINE PORT 2 PREFERRED TELNET 192.75.1.0 Local>> DEFINE PORT 3 DEDICATED TELNET 192.0.1.221 |
Secure ports (set using the Set/Define Port Security command) cannot be locked.Figure 8-19 displays an example.
Figure 8-19: Locking and Unlocking a Port
| Local> LOCK Password> donut (not echoed) Verification> donut (not echoed) Unlock password> donut (not echoed) Local> |
The Set/Define Server Lock command controls whether or not local users are permitted to lock ports.
To enable Signal Check, use the following command:
Figure 8-20: Enabling Signal Check
| Local>> DEFINE PORT 3 SIGNAL CHECK ENABLED |
For detailed information on authentication, refer to Chapter 11 - Security.
Figure 8-21: Requiring Login Password
| Local>> DEFINE PORT 2 PASSWORD ENABLED |
The login password is set with the Set/Define Server Login Password command.
Figure 8-22: Set/Define Port Authentication Command
| Local>> DEFINE PORT 3 AUTHENTICATE ENABLED |
Set/Define Authentication is described in Chapter 11 - Security.
Ports can also be configured to automatically log out when they've been inactive for a specified period of time.
Figure 8-23: Enabling Dsrlogout
| Local>> DEFINE PORT ALL DSRLOGOUT ENABLED |
To enable Inactivity Logout, use the following command:
Figure 8-24: Enabling Inactivity Logout
| Local>> DEFINE PORT 3 INACTIVITY LOGOUT ENABLED |
Figure 8-25: Enabling Interrupts
| Local>> DEFINE PORT 2 ACCESS DYNAMIC Local>> DEFINE PORT 2 INTERRUPTS ENABLED |
To enable Security on a particular port, use the Set/Define Port Security command.
Figure 8-26: Enabling Security
| Local>> DEFINE PORT 3 SECURITY ENABLED |
Figure 8-28: Enabling Broadcast Messages
| Local>> DEFINE PORT 3 BROADCAST DISABLED |
Use of these commands is relatively straightforward. Please refer to the designated page references for the appropriate syntax.
An LRS port is connected to a modem. The LRS port transfers data to the modem at 15200 bits per second, but the modem can only send data over the phone line at 15,000-30,000 bits per second. In a short period of time, the modem's buffer fills with data. The modem sends a signal to the LRS to stop sending data, and the LRS does not send data until it receives a signal from the modem that it can receive data again.
When the LRS is communicating with a device, the LRS and the device must agree on the type of flow control used.
For example, the LRS will assert RTS when it is ready to accept data. When it can no longer accept data (its buffers are full) it will deassert this signal. A connected modem will monitor the assertion and deassertion of this signal; it will only send data when RTS is asserted.
A modem will assert CTS when it is ready to accept data. When its buffers are full, it will deassert CTS to indicate to the LRS that it should stop sending data. The LRS will only send data when CTS is asserted.
RTS/CTS is the most reliable method of flow control, and is the recommended method for the LRS. In the event that RTS/CTS flow control cannot be used, XON/XOFF flow control is recommended. This is explained in Software Flow Control, below.
Applications that use the Ctrl-Q and Ctrl-S characters (for example, certain text editors) will conflict with XON/XOFF flow control. If a user enters a Ctrl-Q or Ctrl-S, these characters won't be transmitted; they'll be interpreted as flow control characters and removed from the data stream.
If your configuration requires that XON/XOFF characters remain in the data stream (rather than being removed) and you are using XON/XOFF flow control, the Passflow option must be enabled. See Figure 8-30.
Protocols that require an 8-bit clean data path cannot use XON/XOFF flow control. An 8-bit clean data path is one that data passes through completely unchanged. SLIP and UUCP require an 8-bit clean data path; PPP may have the same requirements if the Asynchronous Character Control Map (ACCM) isn't set properly. To configure the ACCM, see Chapter 7 - PPP.
1. Set Appropriate Line/Serial Speeds
Consider the line speed and the serial speed of the modem; if data is being compressed, the serial speed should be slightly higher than the line speed. See your modem's documentation for information on configuring line and serial speeds. If you're connecting a terminal to the port, ensure that the speed of the terminal matches the port speed.
See Chapter 9 - Modems, for a detailed discussion of line and serial speeds and data compression.2. Disable Autobaud
In order to ensure that the set speeds are always used, disable any automatic speed selection or autobaud options on your modem.
In addition, disable autobaud on the LRS port you're configuring. To do this, you'll use the Set/Define Port Autobaud command. This command requires that you be a privileged user; if you aren't currently a privileged user, use the Set Privileged command. See the example below.
Figure 8-29: Disabling Autobaud
| Local>> DEFINE PORT 2 AUTOBAUD DISABLED |
Refer to Flow Control for a description of the different flow control methods. Choose the method that's most compatible with the modem and applications you'll be using.
Configure your modem to use the selected method of flow control. Refer to your modem's documentation for instructions.
To configure flow control on the LRS, the Set/Define Port Flow Control command is used. Figure 8-29 displays an example.
Figure 8-30: Configuring RTS/CTS Flow Control
| Local>> DEFINE PORT 2 FLOW CONTROL CTS |
Figure 8-31: Enabling Passflow
| Local>> DEFINE PORT 2 PASSFLOW ENABLED |
In most situations, Passflow does not need to be enabled.
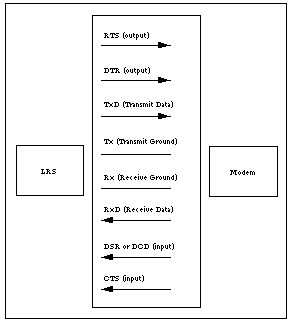
An in-depth description of modem signals is given in Chapter 9 - ModemsAll LRS DB25 and RJ45 signals are displayed in the following figures.
Figure 8-32: LRS DB25 Serial Signals
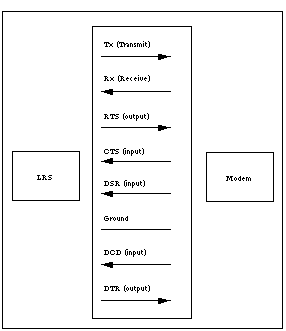
Figure 8-33: LRS RJ45 Serial Signals
Signal Check is generally enabled for use with printers; if the printer doesn't assert the DSR signal, it's assumed to be disconnected or powered off. In this case, the remote login isn't permitted, and print jobs are not sent from the LRS to the printer.
To enable Signal Check, use the following command:
Figure 8-34: Enabling Signal Check
| Local>> DEFINE PORT 3 SIGNAL CHECK ENABLED |
RJ45 ports have one pin that can be used for either DSR or DCD. If you are using modems, this pin must be wired to the modem's DCD pin. If you are using another type of device (such as a terminal or printer), this pin should be wired to the device's DSR pin. Refer to the Pinouts appendix of your Installation Guide for instructions.
LRS ports can be configured to assert DTR only when a user logs into the port by enabling the Dtrwait characteristic. See Set/Define Port Dtrwait for details.
The LRS is a DTE device. Modems are DCE devices. This means that they transmit signals differently; the LRS will use a particular signal to send data, where the modem will use that same signal to receive data.
Some devices that the LRS will connect to (such as printers) are DTE devices. Transmitting data between two DTE devices requires the use of a null modem cable to swap the signals; for complete wiring instructions, refer to the Pinouts appendix of your Installation Guide.
Figure 8-35: Restoring Default Port Settings
| Local>> PURGE PORT 2 |
Each virtual port is created with a default set of characteristics. The Set Port commands can be used to customize a virtual port during the Telnet/Rlogin session, however, these customizations cannot be saved.
To make configurations that apply to all virtual ports (all future Telnet/Rlogin connections), use Define Port commands, specifying port 0 as the port number. Figure 8-35 displays an example.
Figure 8-36: Configuring Virtual Ports
| Local>> DEFINE PORT 0 AUTHENTICATION ENABLED |
After logging in, users may change or clear these characteristics during their login session using Set Port commands.When the command in Figure 8-35 is used, all future network logins will be required to enter a username and password.
Define Port 0 commands are often used to provide local switches to network logins, as they typically do not have a Break key to use after the connection is made.
To display the characteristics used for virtual ports, enter the following command:
Figure 8-37: Displaying Virtual Port Characteristics
| Local>> LIST PORT 0 |
For a complete description of dialback, see Dialback.
Figure 8-38: Enabling Menu Mode
| Local>> DEFINE PORT 3 MENU ENABLED |
For a complete discussion of menu mode, see Menu Mode.
Figure 8-39: Assigning Port Name
| Local>> DEFINE PORT 3 PORT NAME "highspeed_modem" |
Figure 8-40: Enabling Loss Notification
| Local>> DEFINE PORT 2 LOSS NOTIFICATION ENABLED |
Figure 8-41: Disabling Telnet Pad
| Local>> DEFINE PORT 3 TELNET PAD DISABLED |
Figure 8-42: Configuring the Device Type
| Local>> DEFINE PORT 3 TYPE ANSI |
For more information about Type options, refer to Set/Define Port Type.
Figure 8-43: Specifying a Terminal Type
| Local>> DEFINE PORT ALL TERMTYPE IBM1000 |
By default, a specific terminal type isn't specified.Termtype information is used for outbound sessions; the LRS doesn't use this information. For example, a remote host might use the terminal type to configure your terminal to run a particular application.
Figure 8-44: Specifying a Username
| Local>> DEFINE PORT 3 USERNAME fred |
| Port Access | |||
| To | Use This Command | Example(s) | What Example Does |
| Change a Port's Access | Set/Define Port Access | DEFINE PORT 2 ACCESS DYNAMIC | Permits incoming and outgoing connections on port 2. See Access to a Port for more information. |
| DEFINE PORT 2 ACCESS LOCAL | Permits only local logins on port 2. | ||
| DEFINE PORT 2 ACCESS REMOTE | Permits only remote logins on port 2. | ||
| DEFINE PORT 2 ACCESS NONE | Prevents all incoming and outgoing connections on port 2. | ||
| Port Startup Procedure | |||
| To | Use This Command | Example(s) | What Example Does |
| Configure a Port to Start Automatically When the LRS is Booted | Set/Define Port Autostart | DEFINE PORT 2 AUTOSTART ENABLED | Configures port 2 to automatically start when the unit is booted. See Automatic Start-up for more information. |
| Configure a Port to Wait for Character Input Before Starting | Set/Define Port Autostart | DEFINE PORT 2 AUTOSTART DISABLED | Delays port 2's startup procedure until the port receives a character. See Waiting For Character Input Before Starting for more information. |
| Running PPP/SLIP | |||
| To | Use This Command | Example(s) | What Example Does |
| Enable a Port to Run PPP/SLIP | Set Port PPP | DEFINE PORT 2 PPP ENABLED | Enables use of the Set PPP command on port 2. See PPP Mode for more information. |
| Set Port SLIP | DEFINE PORT 2 SLIP ENABLED | Enables use of the Set SLIP command on port 2. See SLIP Mode for more information. | |
| Automatically Run PPP/SLIP When a PPP/SLIP Packet is Received | Define Port PPPdetect Enabled | DEFINE PORT 2 PPPDETECT ENABLED | Port 2 will automatically run PPP when it receives a PPP packet. See Automatic Protocol Detection for more information. |
| Set/Define Port SLIPdetect Enabled | DEFINE PORT 2 SLIPDETECT ENABLED | Port 2 will automatically run SLIP when it receives a SLIP packet. See Automatic Protocol Detection for more information. | |
| Sessions | |||
| To | Use This Command | Example(s) | What Example Does |
| Set the Maximum Number of Simultaneous Sessions on a Port | Set/Define Port Session Limit | DEFINE PORT 2 SESSION LIMIT 6
| Up to 6 sessions may be simultaneously run on port 2. See Multiple Sessions for more information. |
| Set the Key Used to Switch to the Previous Session | Set/Define Port Backward Switch | DEFINE PORT 2 BACKWARD SWITCH ^B | On port 2, pressing Ctrl-B will switch to the previous session. See Switching Between Sessions for more information. |
| Set the Key Used to Switch to the Next Session | Set/Define Port Forward Switch | DEFINE PORT 2 FORWARD SWITCH ^F | On port 2, pressing Ctrl-F will switch to the next session. |
| Specify a Break Key Equivalent | Set/Define Port Local Switch | DEFINE PORT 2 LOCAL SWITCH ' | On port 2, pressing the apostrophe ( ' ) key will exit the current session. See Break Key Equivalent for more information. |
| Sessions, cont. | |||
| To | Use This Command | Example(s) | What Example Does |
| Control What the Break Key Does | Set/Define Port Break | DEFINE PORT 2 BREAK LOCAL | On port 2, pressing the Break key will suspend the current session and display the Local> prompt. See Effect of Break Key for more information. |
| DEFINE PORT 2 BREAK REMOTE | On port 2, when the Break key is pressed, the character will be passed to the remote service. | ||
| DEFINE PORT 2 BREAK DISABLED | Pressing the Break key on port 2 will have no effect (the key is ignored). | ||
| Issue Messages When a Session is Connected, Disconnected, or Switched | Set/Define Port Verification | DEFINE PORT 2 VERIFICATION ENABLED | When sessions on port 2 are connected, disconnected, or switched, a message will be issued. See Monitoring Session Activity for more information. |
| Preferred/Dedicated Services and Protocols | |||
| To | Use This Command | Example(s) | What Example Does |
| Specify a Preferred Service | Set/Define Port Preferred | DEFINE PORT 2 PREFERRED SERVICE lrs_modem | Specifies "lrs_modem" as port 2's default service. If the Connect command is used on port 2 and a service is not specified, the user will be connected to "lrs_modem". See Preferred Services for more information. |
| Specify a Preferred Telnet Host | Set/Define Port Preferred Telnet | DEFINE PORT 2 PREFERRED TELNET 192.75.1.0 | Specifies host 192.75.1.0 as port 2's default Telnet host. If the Connect command is used on port 2 and a service is not specified, the user will be telnetted to 192.75.1.0. See Preferred/Dedicated Telnet Hosts for more information. |
| Preferred/Dedicated Services and Protocols, cont. | |||
| To | Use This Command | Example(s) | What Example Does |
| Automatically Connect to the Preferred Service/Host at Login | Set/Define Port Autoconnect Enabled | DEFINE PORT 2 AUTOCONNECT ENABLED | When users log into port 2, they will automatically be connected to the preferred service. |
| Specify a Dedicated Service | Define Port Dedicated | DEFINE PORT 2 DEDICATED lrs_modem | When users log into port 2, they will automatically be connected to the "lrs_modem" service. If they log out of the service, they will be logged out of the LRS. See Dedicated Services for more information. |
| Specify a Dedicated Protocol (PPP or SLIP) | Define Port PPP Dedicated or Define Port SLIP Dedicated | DEFINE PORT 2 PPP DEDICATED | When port 2 is started, it will automatically run PPP. SLIP may not be run on this port, and the Local> prompt cannot be accessed. See Dedicated Protocols for more information. |
| Specify a Dedicated Telnet Host | Define Port Dedicated Telnet | DEFINE PORT 5 DEDICATED TELNET hermes | When users log into port 2, they will automatically be connected to host "hermes". If they log out of the host, they will be logged out of the LRS. See Dedicated Protocols for more information. |
| Port Restrictions | |||
| To | Use This Command | Example(s) | What Example Does |
| Prevent Remote Connections to a Port Until the DSR Signal is Asserted | Set/Define Port Signal Check | DEFINE PORT 2 SIGNAL CHECK ENABLED | Remote connections may not be made to port 2 until the DSR signal is asserted. See Preventing Access Until DSR is Asserted for more information. |
| Port Restrictions, cont. | |||
| To | Use This Command | Example(s) | What Example Does |
| Lock a Port | Set/Define Server Lock | LOCK | Prompts for a "locking" password; when one is entered and confirmed, the port is locked. To unlock the port, this password must be entered. See Locking a Port for more information. |
| Force Users to Enter a Login Password | 1. Set/Define Server Login Password | DEFINE SERVER LOGIN PASSWORD "badger"
| Defines "badger" as the login password. See Login Password or Chapter 11 - Security for more information. |
| 2. Set/Define Port Password Enabled | DEFINE PORT 3 PASSWORD ENABLED | Incoming callers on port 3 will be forced to enter the login password, "badger". | |
| Force Telnet/Rlogin Users to Enter the Login Password | Set/Define Server Incoming Password | DEFINE SERVER INCOMING PASSWORD | Incoming Telnet/Rlogin users will be required to enter the login password, "badger". See Login Password for more information. |
| Force Users to Enter a Username/Password Pair Before PPP/SLIP Runs | 1. Define Port PPPdetect Disabled or Set/Define Port SLIPdetect Disabled | DEFINE PORT 3 PPPDETECT DISABLED DEFINE PORT 3 SLIPDETECT DISABLED | Disables autodetection of PPP/SLIP on port 3. See Automatic Protocol Detection for more information. |
| 2. Set/Define Port Authenticate | DEFINE PORT 3 AUTHENTICATE ENABLED | Incoming callers on port 3 will be forced to enter a username/password pair. This pair will be checked against any configured authentication databases. See Username/Password Authentication or Chapter 11 - Security for more information. | |
| Automatically Log Out a Port When the DSR Signal is Dropped | Set/Define Port Dsrlogout Enabled | DEFINE PORT 2 DSRLOGOUT ENABLED | When the DSR signal is dropped (deasserted), port 2 will be logged out. See Automatic Logouts for more information. |
| Port Restrictions, cont. | |||
| To | Use This Command | Example(s) | What Example Does |
| Configure Port Inactivity Logouts | 1. Set/Define Server Inactivity Limit | DEFINE SERVER INACTIVITY LIMIT 15
| Sets a server-wide inactivity limit of 15 minutes. See Inactivity Logouts for more information. |
| 2. Set/Define Port Inactivity Logout | DEFINE PORT 2 INACTIVITY LOGOUT ENABLED | Enables inactivity logouts on port 2. When port 2 is inactive for 15 minutes, the port will be logged out. Any active connections will be disconnected. | |
| Permit Local Logins While a Network Connection is Running | 1. Set/Define Port Access Dynamic | DEFINE PORT 2 ACCESS DYNAMIC | Permits incoming and outgoing connections on port 2. See Access to a Port for more information. |
| 2. Set/Define Port Access Enabled | DEFINE PORT 2 INTERRUPTS ENABLED | Local logins to port 2 will disconnect any current network sessions. See Interruption of Network Connections for more information. | |
| Restrict a User's Use of Commands | Set/Define Port Security Enabled | DEFINE PORT 2 SECURITY ENABLED | Users on port 2 will only be able to enter a limited number of commands at the Local> prompt. See Restriction of Commands for more information. |
| Enable/Disable a Port's Receipt of Broadcast Messages | Set/Define Port Broadcast Enabled/Disabled | SET PORT 2 BROADCAST DISABLED | Blocks port 2's receipt of broadcast messages. See Receipt of Broadcast Messages for more information. |
| Flow Control: Step by Step Configuration | |||
| To | Use This Command | Example(s) | What Example Does |
| Set the Appropriate Line and Serial Speeds | See your modem's documentation or Chapter 9 - Modems. | ||
| Disable Autobaud | Set/Define Port Autobaud Disabled | DEFINE PORT 2 AUTOBAUD DISABLED | Disables Autobaud on port 2. See Flow Control for more information. |
| Enable RTS/CTS or XON/XOFF Flow Control | Set/Define Port Flow Control | DEFINE PORT 2 FLOW CONTROL CTS | Enables RTS/CTS flow control on port 2. See Flow Control for more information. |
| Modem Signals | |||
| To | Use This Command | Example(s) | What Example Does |
| Automatically Log Out a Port When the DSR Signal is Dropped | Set/Define Port Dsrlogout Enabled | DEFINE PORT 2 DSRLOGOUT ENABLED | When the DSR signal is dropped (deasserted), port 2 will be logged out. See Automatic Logouts for more information. |
| Require the Assertion of the DSR Signal for Remote Logins | Set/Define Port Signal Check Enabled | DEFINE PORT 2 SIGNAL CHECK ENABLED | Before remote connections to port 2 will be permitted, the DSR signal must be asserted. See DSR (Data Set Ready) for more information. |
| Assert the DTR Signal Only When a User Logs Into a Port | Set/Define Port Dtrwait | DEFINE PORT 2 DTRWAIT ENABLED | On port 2, the DTR signal will not be asserted until a user logs into the port. See DTR (Data Terminal Ready) for more information. |
| Control Modem Operation | See Chapter 9 - Modems. | ||
| Restoring Default Port Settings | |||
| To | Use This Command | Example(s) | What Example Does |
| Restore Default Port Settings | Purge Port | PURGE PORT 2 | Restores port 2's default settings. See Restoring Default Port Settings for more information. |
| Misc. Port Settings | |||
| To | Use This Command | Example(s) | What Example Does |
| Automatically Detect and Match the Incoming Baud Rate, Parity, and Character Size | 1. Set/Define Port Access Local | DEFINE PORT 2 ACCESS LOCAL | Sets port 2's access to local. This is required in order to enable Autobaud. See Access to a Port for more information. |
| 2. Set/Define Port Autobaud Enabled | DEFINE PORT 2 AUTOBAUD ENABLED | Enables Autobaud on port 2. The port will automatically detect and match the incoming baud rate, parity, and character size. See Autodetection of Port Characteristics for more information. | |
| Secure Ports Using Automatic Dialback | See Dialback. | ||
| Display a Menu (Instead of the Local> Prompt) Upon Login | Set/Define Port Menu Enabled | DEFINE PORT 2 MENU ENABLED | When users log into port 2, a menu will be displayed (rather than the Local> prompt). See Menu Mode, Menu Mode, or Set/Define Menu for more information. |
| Assign a Name to a Port | Set/Define Port Name. | DEFINE PORT 2 PORT NAME "highspeed_modem" | Assigns the name "highspeed_modem" to port 2. See Naming Ports for more information. |
| Misc. Port Settings | |||
| To | Use This Command | Example(s) | What Example Does |
| Send a Character When an Error or Data Overrun Causes the Loss of a Character | Set/Define Port Loss Notification Enabled | DEFINE PORT 2 LOSS NOTIFICATION ENABLED | When a character is lost during a connection to port 2, a Ctrl-G character will be sent. See Notification of Character Loss for more information. |
| Disable the Padding of Carriage Returns During Telnet Sessions | Set/Define Port Telnet Pad Disabled
| DEFINE PORT 2 TELNET PAD DISABLED | Disables the padding of Carriage Returns on port 2. See Padding Return Characters for more information. |
| Configure the Device Types Compatible With a Port | Set/Define Port Type | DEFINE PORT 2 TYPE ANSI | Specifies that port 2 is compatible with ANSI devices. See Setting the Device Type for more information. |
| Specify a Default Username for a Port | Set/Define Port Username | DEFINE PORT 2 USERNAME fred | Defines "fred" as port 2's default username. When users log into port 2, they will not be prompted to enter a username. See Specifying a Username for more information. |
LRS Reference Manual - 4 MARCH 1996
Generated with Harlequin WebMaker